Wild animals. Based on Russian folk tale"The Fox and the Wolf"
Modeling from plasticine. Senior group.
2. Main part.
Look carefully at the animals that I made...(demonstrate).
Tell me, how many parts do you see on a fox? (children's answers) That's right, three. Name these parts. (children's answers - head, torso, tail).
How many parts do you see on a wolf? (children's answers) Three. Name them. (children's answers - head, torso, tail).
What do you see in common between a fox and a wolf? (children's answers - they both have a head, a torso and a tail). How are animals different? (children's answers - a fox's tail is long and fluffy, but a wolf's is shorter and not so fluffy).
Fine. How many main parts does a wolf have? (three) The fox? (three)
So how many parts will we divide the block of plasticine into? (into three parts).


Physical education minute.
Like our animals (Clap your hands.)
The paws are knocking merrily:
Top-top-top, top-top-top. (Stamping feet.)
And my legs are tired,
Hands clap:
Clap-clap-clap, clap-clap-clap. (Clap your hands.)
And then squat down (Squats.)
Animals dance nearby. (Jumping in place.)
And when they start running - (Running in place.)
No one can catch them.
Let's get to work.(Children are working, the teacher shows with parallel commentary). We divide the plasticine according to the scheme... First in half. We divide one part in half again. (After each action, the teacher looks at the children’s progress and the quality of their work).
Take most of it and knead it well. Rolled into a cylinder (sausage).
They put it on the board and pressed it, flattening it. Using a stack, we make cuts on the right and left on the workpiece. The cuts should be the same. We smoothed the cut areas with our fingertips and rounded the entire part to create a rainbow shape.
Take part 2. Roll into a ball. Use your fingers to stretch out one side and sharpen it. This will be the head. At the top of the head we draw out two ears, they look like triangles.
Take part 3. What will it be? (children's answers - tail). Right. Let's play the game "Where is whose tail?" (The teacher places images of animals without tails on a magnetic board: a hare, a wolf, a fox, a squirrel. Children explain in words where whose tail is. For example, the first one on the left is a squirrel’s tail, etc. Children repeat which tail is the fox’s, which is the wolf.) Rolled up a flagellum. We sharpen at the ends.
We attach the details. What can we do to prevent the parts from falling later? (children's answers - smooth the joints with our fingers).
We make eyes, but they should not be big. And the nose. Decorate the tail and paws of the fox.
Show me what you got?
3. Final part.
- Guys, what did we do today? (children's answers - they sculpted a wolf and a fox)
– Have you learned something new? (children's answers - sculpt the body and legs from one piece)
– You tried hard today. Place your forest dwellers on plates. We remove workplace.
You can mold a figurine of any animal from plasticine, no matter whether it is domestic or wild. The main rule in this creativity is to use desired color material. Today we will look at how to make animals from different parts of nature from plasticine.
Many children are interested in African animals made from plasticine. For example, almost everyone knows such a giant as a giraffe, and kids really want to get a plasticine figurine, because almost no one has seen a real giraffe live.
If your child saw a giraffe in a cartoon and became interested in it, offer to mold it from plasticine. It's not difficult, and the sculpting method is similar to that of.
Modeling animals of this kind from plasticine allows a child to develop their imagination, begin to think rationally, learn to make corrections in a decision made and, of course, develop their motor skills.
We prepare the same materials, we only change the color of the plasticine. We will need orange and beige. We begin work on the animal's head:


Continuing the theme of exotic animals, you can consider birds that do not fly and love the cold very much - of course, despite their funny appearance, such birds evoke tenderness. Before molding such animals from plasticine in stages, prepare several contrasting pieces of plasticine, namely black and white. Additionally, you can use pink color. Of course, prepare a board and stack. Let's start creating:


The craft is done. You have read the instructions on how to mold these animals from plasticine step by step. If exotic animals are enough for you, we suggest going further and making more familiar representatives of the fauna, which we will talk about below.
Almost every child can make a “woolen” sheep; it is enough to know the main points on how to make various animals from plasticine.
The key feature of this craft is that to make it you need to create a lot of small balls. Not every child will want to do so many details; adults should understand that the child needs help.
We present the most basic type of craft. The base of the sheep can be plasticine, but the wool can be rolled from cotton wool. Check out our tutorial and get to work.
To make this animal similar to the original, try to prepare natural colors, this does not apply to fairy-tale sheep for which any shades can be used. Let's start modeling from plasticine for children:


A soft, almost airy sheep is made. It only takes a few simple steps, but this plasticine craft for children can be called one of the most interesting and useful.
Above we looked at instructions on how to sculpt various animals from plasticine. The following instructions will allow you to learn how to sculpt a rosy-cheeked farm dweller - a pig. Designing a piglet is simple and requires few parts and time. The sculpting of this character is relevant, because piglets are often found in animated series and even in poems.
We will make a craft from pink. You need a lot of it, pay attention to whether you have the required block in your set, if not, don’t despair. Show your child how to get this color using others (white and red). If everything is ready, let's start creating:
 Pig (Step 1)
The work is finished. Modeling of this animal simple task even for the smallest children. A step by step instructions in the form of photographs will make this lesson receptive for little ones.
Perhaps every parent should know how to make animals from plasticine. Sculpting animals is both simple and difficult at the same time, since models usually consist of several parts that need to be connected together. Therefore, it is better for parents to help the child and know how to do it better and more clearly.
Children can start modeling from the age of 1-1.5 years. This activity helps develop fine motor skills.

The child sculpts from plasticine and develops brain centers, as well as aesthetic taste, abstract thinking, and imagination. When sculpting together, you can tell your child about the characteristics of animals, their habits and habitats. This way, the process of creating animals from plasticine can be made interesting and educational.
Let's look at several master classes step by step on how to make different animals living at home and in the wild.


Any plasticine or modeling mass is suitable for modeling. Can be purchased polymer clay, then the figures will harden and remain for a long time, “Play-Doh” or regular plasticine in 6 or 12 colors.
Basically, all animal models consist of several elements. For ease of fastening, so as not to deform the toy, you can use toothpicks, matches or dry spaghetti.


First, let's make simple pets - a cat, a dog, a rabbit. We will make a well-fed or fluffy cat from red plasticine.
To do this you need:
Work progress:


The cat is ready!

You can make a dog using the instructions below:

The white rabbit is a little more complicated to make and takes more time, but it turns out very cute and beautiful.
For modeling you will need white, orange and green plasticine, tools and toothpicks (thin spaghetti).
How to do:


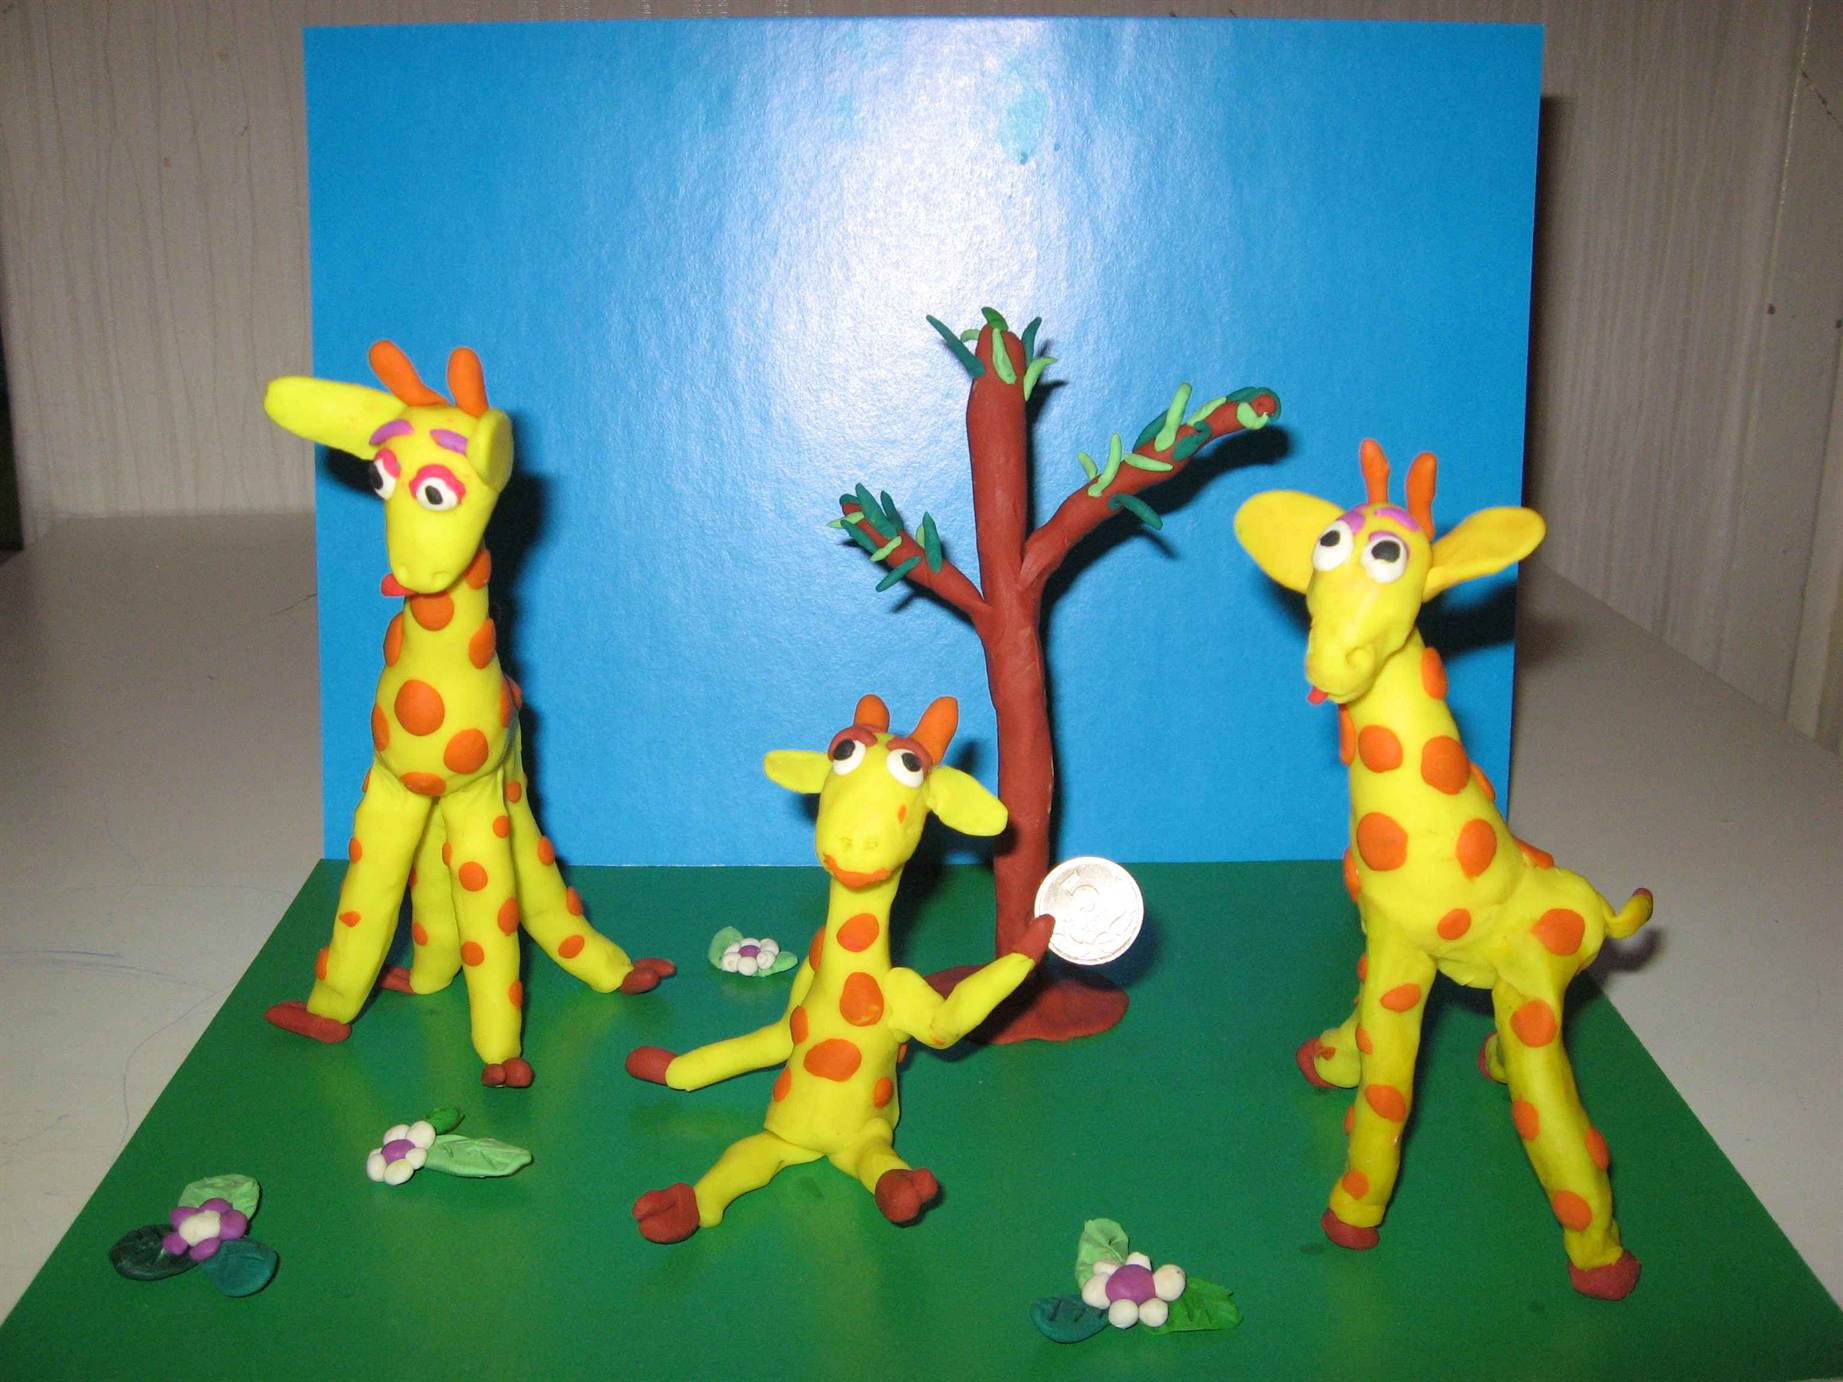
With your child you can try to sculpt those animals that he saw at the zoo. For example, make a polar bear, a giraffe and a lion.
A simple white bear can be made as follows:

Giraffe is easy to make.
To do this, you need to prepare orange, white, yellow and black plasticine, toothpicks, tools and a board.
How to do:


The giraffe can be placed among trees and plants, such as palms, also made of plasticine. For this you need brown and green plasticine. The trunk is made up of checkers made from balls of different sizes, and the leaves are made from green circles or rolled out plasticine.

A cute lion cub can be made from balls of yellow, orange, brown and white plasticine.


Sea animals should also not be ignored; besides, they are quite easy to sculpt. Let's make a killer whale - an inhabitant of cold seas.

You will only need two colors of plasticine - black and white.
Let's talk about how to make animals from plasticine. Modeling classes are considered useful at any age. Thanks to this type of visual activity, children receive the necessary knowledge about the shape and properties of objects, and reinforce colors and shades. During practical activities, the baby's motor skills develop well.
You can sculpt with children after a walk in the park or at the sea. What you see on a walk can be depicted as But after visiting the city zoo, it will be interesting to consolidate your knowledge about wild animals in the process of sculpting. What animals can be molded from plasticine? Absolutely any. After the excursion, the child can tell who he met, who he liked best, which animals are representatives of our country, and which live in distant hot countries.
While studying animals, the child must understand what parts of the body they have, what shape the body is, the head, whether there is a tail, what length and shape it is. You will also need knowledge about the color of the fur of the craft character, whether there are horns on the head or not, what shape and size the ears are. Why does a giraffe have such a long neck? At the same time, the child recognizes the properties of plasticine. For example, when creating a giraffe, a child must understand that such a long neck will not hold upright on its own, but over time will fall on its side under the weight of plasticine. To prevent this from happening, you need to use inserts, such as a toothpick or a stick. Thin and long legs, such as those of a deer or ostrich, are also strengthened.
How to make animals from plasticine, read the article below. Let's start with a resident of the eastern regions - the tiger. You will need orange, black and yellow plasticine. The largest piece of material will go on the body of the predator. It is made in an elongated oval shape. Four identical paws are attached to the bottom. A round head is mounted on the front of the body, on the top of which there are two semicircular ears.
The tiger's tail is long, with a black tassel at the end. The animal's muzzle is formed from three flattened yellow balls. Dots are made on them with a pencil. The nose itself is black, attached to the center of the muzzle. The eyes are small round black balls that are slightly pressed into the front of the animal's head. Lastly, long thin sticks are made from black plasticine and attached along the entire body. These are the stripes on a tiger's fur.
If you don’t know how to make animals from plasticine, read our recommendations below. The next step is to figure out how to make a monkey using gray and peach colors. The head and torso of the primate are molded from balls, only the body needs to be made larger. The arms and legs of chimpanzees are represented by long and thin sticks, which are applied with fingers to the body from above and below.

The semicircular ears consist of two parts. The outer part is gray and the inner part is peach. Hands and feet are sculpted using a stack - a special plastic knife for plasticine. The last thing to do is work on the muzzle. A ball is rolled out of light plasticine and attached to the bottom of the head. Above you need to cut out the eyes. To do this, the plasticine is rolled out in a thin layer and the required shape is cut out in a stack. Dots are placed in the center with a pencil.
You can make animals from plasticine with your child, starting with an elephant. This is an amazing animal with a shape that is easy to recreate using plasticine. The long nose-trunk is attached to the large head at the front. So that the elephant can breathe, holes are made on its end part with a pencil, and stripes are drawn with a stack. On both sides of the trunk are white fangs. Above the nose, on the large massive head, are the eyes. They are made from two colors. White circles are on the bottom, and black circles are on the second layer.

The large head should be firmly attached to the body; you can strengthen it with a toothpick. Elephant feet are known to everyone for their pillar-like shape. They are sculpted from thick sticks and placed on the bottom of the stomach. The tail of the animal is small and thin, narrowed downwards. There is a small brush at the tip.
The most recognizable part of an elephant's body is its huge ears. They are molded by pressing the balls with your fingers on both sides. White ear centers are made in the same way.
Let's look at it step by step using the example of a crocodile. The body of an amphibian is formed from a piece of green plasticine. The tail and jaws are extended. Using a stack, an incision is made in the mouth so that the lower jaw is slightly thinner than the upper jaw. And by pressing down from above, the tip is dulled, and the nostrils are pressed with a pencil. They also make dents on the animal’s forehead with their fingers and insert eyes into the cavities - white balls with black dots. You can make orange eyelids like in the photo below.

The paws are made the same size and claws are attached to each paw from white plasticine. All that remains is to make a ridge on the back. To do this, you need to form balls from small pieces and, pressing down, place them on the back of the animal along an even center line. If desired, a pair of sharp teeth are attached to the mouth.
To make such a tall craft durable, you need to insert a wire or wooden stick inside. A torso is sculpted from a large piece of plasticine, along with a long neck and a head that bends forward. Small horns and ears are attached to the top of the head.

Then four legs are made and the fingers are applied to the bottom of the body. Several circles are glued to the body and neck of the animal. It is interesting to make a giraffe from yellow plasticine, and the spots on the body are brown. This way, the craft will look more like the original.
Now you know how to make zoo animals from plasticine. Get to work with children. Good luck!
Plasticine horse
You can make a wide variety of gifts and toys from plasticine. IN kindergarten special attention is paid to modeling, as it develops fine motor skills, perseverance, patience and imagination. Plasticine crafts have a positive effect on abstract thinking, logic, and even the speech of young children. You can try to teach your child to sculpt at home, because he can do this from the age of 1.5 years.
Today there are many special books for plasticine applications, as well as special tools for sculpting. It is necessary to prepare a workplace for the child so as not to stain everything around with plasticine. To start classes you will need a table, a board, and a plasticine knife.

First, let the child knead a piece of plasticine in his hand. After this, trust him to cover a picture or an ordinary glass jar with plasticine. When your baby gets used to working with this plastic material, you can try making simple crafts, for example, a snake or a caterpillar. They are made from strips or plasticine balls.


It makes it easy to make small details. You can try making combined crafts, for example, from chestnuts and plasticine.

Dinosaur made of pine cones and plasticine

Caterpillar made of chestnuts and plasticine

The cheerful cow is perfect for agricultural themed craft ideas.